Mosin Nagant Rifle Exploded Views and Disassembly All content copyright © 7.62x54r.net |
The Mosin Nagant is a simple design that is easy to repair and maintain, but proper technique and an understanding of the design is important. This page will attempt to guide Mosin owners through partial and complete disassembly and provide a pictorial reference of the various parts. For information on which parts will interchange between various models, see the Mosin Nagant Parts Compatibility page.
Tools Quality gunsmithing tools are imperative to prevent damage during firearm disassembly. Anyone who's handled surplus firearms has seen the stripped screw heads, scratched metal and scarred wood. While damage in battle is part of the history of a firearm, damage from poor maintenance techniques is a destruction of that history. Past damage can't be undone, but future damage can be prevented. A good set of hollow ground screwdrivers in various sizes is the most useful tool on the firearm bench. Following that, brass and steel punches and a light hammer are very handy. Forceps for handling small parts and a magnetic bowl for keeping track of them are useful. A well lit, clean work area also helps prevent the loss of small parts. A protective mat on the bench will protect the finish of the firearm and a gun vise can make the job much easier when "three hands" are required. Plastic picks, nylon brushes, paper or cloth towels, swabs and pipe cleaners make detail cleaning easier. A quality cleaning rod and patches will soon be appreciated over the discount variety for periodic maintenance. Types of solvent and opinions on their use are almost as numerous as gun owners and is beyond the scope of this page. Dummy cartridges for checking function, a firing pin protrusion gauge, and a set of headspace gauges round out the well equipped bench.
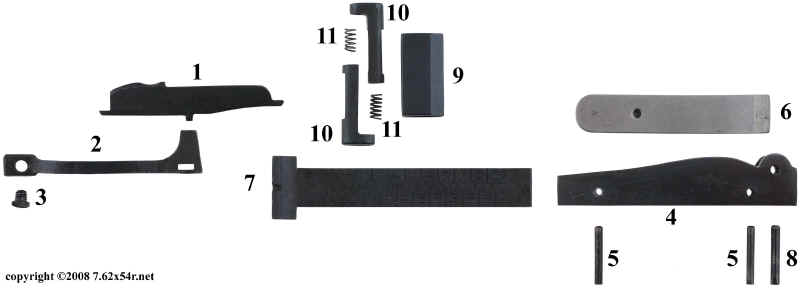
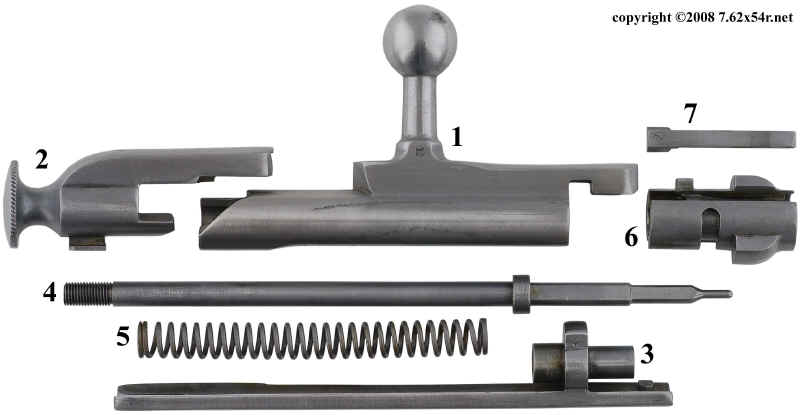
Exploded Views Below are exploded views of a Soviet M91/30. Other models have variations in the parts which will be covered later. The primary differences are in the stock hardware and sights, especially among the later Finnish models. For larger views, click on the pictures.
1. receiver and barrel 2. stock 3. handguard 4. magazine body/triggerguard 5. nosecap 6. nosecap screw 7. front barrel band spring |
8. rear barrel band spring 9. front barrel band 10. rear barrel band 11. cleaning rod 12. cleaning rod retaining nut 13. stock recoil bolt 14. stock recoil bolt nut |
15. butt plate 16. butt plate screw (2) 17. magazine tang screw 18. receiver tang screw 19. front sight 20. rear sight assembly 21. interrupter/ejector assembly |
22. follower assembly 23. floorplate latch and screw 24. trigger/sear assembly 25. bolt assembly 26. sling and dog collars |
1. sear/trigger spring 2. sear screw 3. trigger/bolt stop 4. trigger pin |
5. floorplate latch 6. floorplate latch screw 7. floorplate 8. follower carrier spring |
9. follower carrier spring screw 10. follower carrier pin 11. follower carrier 12. follower spring |
13. follower pin 14. follower |
1. ejector 2. interrupter/ejector spring 3. interrupter/ejector spring screw |
4. rear sight base 5. rear sight base pin (2) 6. rear sight leaf spring |
7. rear sight leaf 8. rear sight leaf pin 9. rear sight slide body |
10. rear sight slide buttons (2) 11. rear sight slide button springs (2) |
1. bolt body 2. cocking knob/safety 3. guide rod/connector 4. firing pin |
5. firing pin spring 6. bolt head 7. extractor |
Disassembly The following pictures and comments will illustrate the disassembly procedure for the Soviet M91/30.
Before beginning disassembly, maintenance, or cleaning on any firearm visually inspect the chamber and magazine to be sure that it is unloaded. | |
Remove the sling by unbuckling the dog collars and removing them from the
sling slots. Unscrew the cleaning rod counterclockwise |
Depress the barrel band retaining springs and slide the barrel bands forward. |
Decock the bolt by turning the cocking knob 90 degrees counterclockwise and pull the bolt head and connector bar forward. |
Remove the magazine tang screw. | ||
Remove the receiver tang screw. |
Depress the floorplate latch and pull the floorplate away from the magazine body. Compress the follower assembly and pull it straight down from the magazine body. |
This completes partial disassembly
for routine cleaning and maintenance.
For detailed disassembly, including the magazine and bolt assemblies, continue below.
Unscrew the butt plate. |
Remove the floorplate latch screw and pull the floorplate latch straight down out of the magazine body/trigger guard. |
Drift out the follower pin and follower carrier pin. The follower carrier spring is screwed to the floorplate. The follower spring can be removed from the follower carrier by lifting up and back. |
Drift out the trigger pin and remove the sear/trigger spring screw. |
Drift the front sight off of it's base. The barrel band can now be removed
from the barrel. Note: The front sight base is staked to hold the sight in place. It should only be removed if necessary. |
Drift the extractor out the back of the bolt head. Note: Removal of the extractor is seldom necessary and there is a risk of damaging it. If it is necessary, a drop of penetrating oil beforehand is recommended. |
Reassembly Reassemble the rifle in the reverse order of disassembly taking note of the following:
Model Specifics The M91/30 was chosen because it is one of the most common models of the Mosin design and is more similar to all other models than any other model. Below are the exceptions to the above instructions for all other commonly encountered models of Mosins.
All content copyright © 7.62x54r.net |